- Admin
- #1
It has come to my attention (after spending nearly a full day attempting to salvage Oculus) that we be requiring some tutorials on proper cave design. (There's also just so many examples of caves done horribly wrong in MSC, I figure it's best to avoid some reproduction of said BSP butchering.)
The following map contains several examples of several legit methods for making caves, divided into several vis groups:
http://www.thothie.com/msc_dev3/caves_tutor.rar
Terrain Deformation Method:
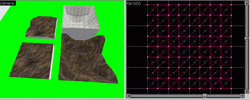
various deformation examples
Ideally, the terrain deformation method involves starting with a box room, and filling the sides with terrain deformations.
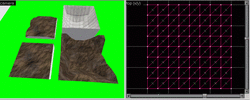
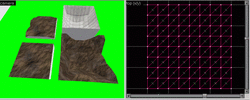
There's several examples on how to create basic terrain deformations in the "Before", "Convex", "Concave", and "Dome" examples, immediately NE of the zero point.
Simplest method is to start with a set of spliced cubes (as seen in the "Before" visgroup) - you can either copypasta a couple of cubes spliced 45 degrees across, or simply splice up one large square box into several smaller ones and splice from corner to corner. After that, it's a simple matter of selecting the vertexes on the top and moving them up or down (or, on a vertical wall, left to right). You should only need to move the vertexes across a single plane on a single face. Ye might be tempted to move them across more than one plane when uniting floors with vertical walls, but it should be achievable just by eliminating cubes from one terrain deform group or another. (If you choose to do it anyways, be sure to move vertexes in the opposing plane, or you may get invalid structures.)
Terrain deformation is done quickest with the "Arrow Keys Nudge Vertex" option enabled (Tools->Options->[2D Options Panel]). You can then select the vertex to move in the 3D view, move the mouse to the proper plane in the 2D view (don't click, just hover), and hit an arrow key to nudge the vertex. With some practice you'll be able to do this without taking your eyes from the 3D view.
Scaling, rotating, or otherwise moving terrain deformations of this type can result in deformed brushes that Hammer will fail to detect, causing visual artifacts, or mystery leaks. So once you've decided where your wall is going to be, stick with it. However, if your deformation is simple enough, and on a good grid, you can usually get away with copy-pasta'ing segments, flipping, and rotating them, to be tiled into new areas.
Real world examples of this method are included in this tutorial from Sfor, Wicard Oven, The_Wall, and the WIP map, Sewer Ride.
In the Sewer Ride and Wicard Oven examples, the terrain has been spliced across, post-deformation, to create red-crystal grooves for additional lighting. This works, but is dangerous - you might need a few attempts before you make a splice through them in a way that won't mess with Hammer or the compiler. It should also likely never be done on a segment exposed to the outside of the hull. (Which shouldn't be an issue if you keep your box framework intact.) Once you've made such a splice, forget about moving the wall in anyway.
Generally, you want to keep main pathing of your caves (ie. the floor) as flat as possible. This helps with both monster and player navigation. The tunnel from The_Wall can't be entered (it's clip brushed so you cannot enter - being there just for show). The Sfor example involves some drastically rugged floor terrain, and you'll see there are clip brushes scattered throughout to prevent your getting stuck therein. (Also, all the monsters in there are projectile tossers, and thus do not need to navigate the nasty terrain.)
This method is fairly friendly wpoly wise, but murder on clip and leaf nodes. To help with the clip nodes, the entire ceiling in the sfor example should likely be inside a clip brush. (Though in this instance, it was not). The Wall's example is entirely inside a clip in the actual map.
If you want a manufactured dome look, create a quarter of the dome, copy pasta, and flip, as in the Dome example here (each quarter is grouped). You'll notice the convex group is also done with a similar method - although in two halves, in that case, so even when going for natural looking terrain, you can get away with some copy-pasta and mirroring. All of the walls in the Sfor example are slightly varied versions of the same terrain formation.
Segmented Caves

segments from Rickler's sorc_villa
If you have a nicely aligned, and fairly simple cave segment, you can usually get away with splicing and, to a degree, skewing it. Provided in the "rickler_segmented" vis group is an example used in Sorc_Villa. Simply copy pasta your cave segment, skewing it here and there to add some variety. Your base segment should be perfectly square. If it is, you can then copy it onto itself, rotate, and splice each resulting segment at 45 degrees to create a 90 degree turn. If the segment is designed simply enough, and all the vertexes meet, it won't even leak. Notice, in the example, how each segment is in its own group.
Block Caves
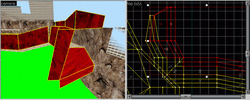
aleyesu - proving, once again, quick and dirty gets the job done more often than not
In the South West corner are extensive examples of some block caves from Aleyesu. These usually involve three simple blocks and a floor, placed at various angles to create variety. Note that the blocks involved are not twisted to join up, but only meet at their corners, this helps keep VIS from becoming a real issue. The more often you can make your caves meet at 90 degree angles, and the more often you can create cube-like areas that VIS can isolate, the less likely you are to run into issues.
Key thing to avoid here is the "Chinese Fingertrap" effect. Don't use multiple wedges all joined at every angle stretching into unpredictable curvatures, or HLVIS's little mind will explode when you attempt to compile. The compiler thinks in box-like areas, try to work with it, rather than against it.
Simple Geometry

simple geometry from ww_shrinkspell
The example from Shrinkspell in the upper North East corner demonstrates various simple geometry turned into caves. This can be the most optimal method, and doesn't look too blocky when combined with some nice textures. There's no real advice here except the usual: Keep it Simple. There's no need to make crazy shapes that the compiler will have trouble digesting.
General Advice
• Keep your floors flat
- Remember monsters cannot navigate ramps in multiplayer, and rugged terrain, in addition to raising your leaf and clip limits, is rough both on players and the compiler.
- If you *must* have a large steep ramp, add a func_monsterclip staircase of 16 unit boxes. You don't have to worry about the monsterclip brushes intersecting with solid map brushes too much.
• Think inside the box
- You should be able to break down the basic structure of your map into boxes, which helps the "golden rectangle" method VIS uses to build nodes. Build from the outside in, with your brushes meeting at 90 degree angles as often as possible. Your rooms should always look simple and logical on at least one of the three planes.
• Keep it Simple Stupid
- The sacred rule of KISS. If you take a month off from mapping, you should have no issues figuring what you did when you come back to it. Group your terrain deforms. Keep a room-by-room style build (don't have brushes stretching across multiple VIS areas - it's hard on the eyes and the compiler).
• Lighting
- Don't attempt to imbed crystal structures into your walls unless both the walls and crystals are extremely simple (and even then, use func_illusionary crystals). The splice method works, but once you've done it, you're going to have to rebuild that wall from scratch if you want to move it. Another, safer method, not demonstrated here, is to use some glowing moss or slime. Take one of your existing textures, photoshop some pale moss or slime onto it, and put it back into your map. You can then stick a point-entity light next to the texture and it should look fairly natural. Don't scale the texture up to allow higher-detailed moss or slime, however, or you'll get that incorrect texture lighting effect when a glowing player runs across it, ala some of the glowing slime textures in Calruin2.
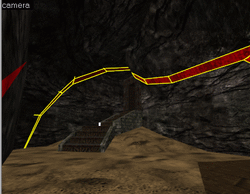
crystal splice
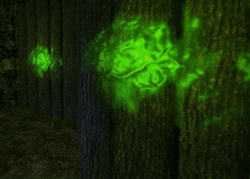
slime lighting - okay, those are trees, so sue me
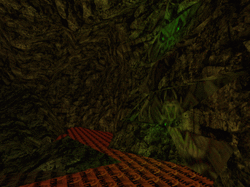
glowing eyes from ancient artifacts and glowing lava textures work too
• Embed Ruins
- An endless twisting set of caves not only looks bad, but is hard on the compiler. Toss in some walls and a room of stone bricks once in awhile. You can take these opportunities to get your walls to line up, save you some vis nodes, and break up the monotony of your map.
There's an exception to this, and that is if you can keep all the joints lined up in at least one plane (preferably two), and break them up into segments, then HLVIS's little mind will remain intact.
Which brings us to...
The Chinese Fingertrap Method

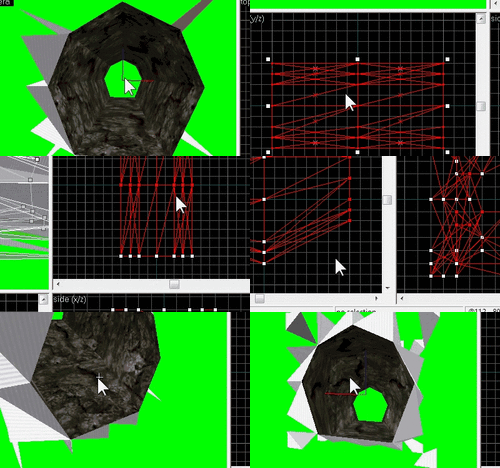
The Chinese Fingertrap method involves this beast:

Basically, a cave segment, made up of nothing but 4 face alternating wedges, with all the vertexes lined up on a 16 unit grid on either end.
The advantage to a 4 face wedge, is that you can twist it any which way, and it won't cause a malform brush.
You can scale, skew, and vertex manip the segments all you want, and it wont cause errors, nor leak, so long as all the vertexes line up at the mouth to each cave segment.
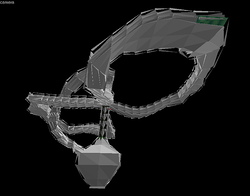
Thus you can do really nutty things, like this:
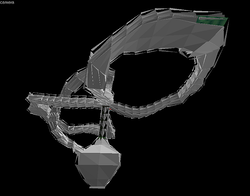
Yes, those are all that same cave segment, including the bulbous room at the bottom, and no, it doesn't leak.
Advantages:
• Extremely flexible, very natural looking caves.
Disadvantages:
• Non-90 degree junctions are kind of a pain.
• Looks like ass in Hammer.
Plus, as with most of these caves, tunnel textures are hard to align.
Surprisingly it isn't too nasty on the clip node count, but if you are saving clip nodes by using a kinder -cliptype during compile, be careful that the caves don't become so narrow or so steep as to stop the player.
Mobs that don't jump will also have a rough time with these caves in laggy situations, so you'll need the usual 16-unit func_mosnterclip staircases used to deal with ramps.
The easiest way to vertex manip these batards, is to select two segments, hit Shift+V then drag out a box to select the joined vertexes away from the center:
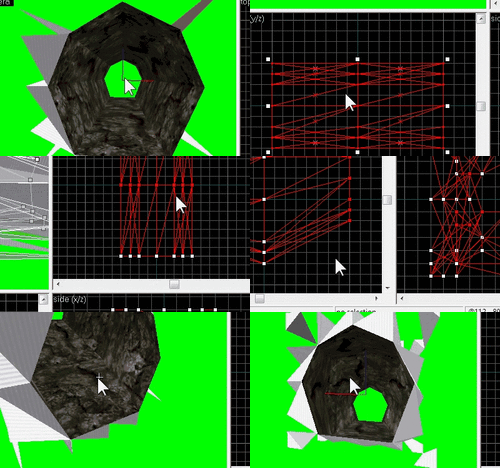
(Mind you I've the "Arrow Keys Nudge" option active.)
But if you don't have to make a hard turn, or make a room from them, skew works just as well without vertex manipulation, so long as it's on a 16 unit grid.
This particular segment won't work well for artificial tunnels, but those generally end at 90 degree angles, making this unnecessary anyways. You can, of course, make smoother, rounder, and more complex tunnels, the same way, but this is about as many vertexes as my eyes can handle. (Plus, you need to keep your floors flat, so as not to mess with your mobs).
Mind the four seemingly superfluous brushes on the outside of the cave segment in this particular example. Leave them - they are guides to make it possible to scale/skew the segment on a 16 unit grid. The compiler will discard them.
This method really requires it's own RMF and BSP, so:
http://www.thothie.com/msc_dev4/chinese_fingertrap.rar
There's a lone example segment, sitting just NE of center.
todo's:
• Add slice&dice method
• Add model method
The following map contains several examples of several legit methods for making caves, divided into several vis groups:
http://www.thothie.com/msc_dev3/caves_tutor.rar
Terrain Deformation Method:

various deformation examples
Ideally, the terrain deformation method involves starting with a box room, and filling the sides with terrain deformations.
There's several examples on how to create basic terrain deformations in the "Before", "Convex", "Concave", and "Dome" examples, immediately NE of the zero point.
Simplest method is to start with a set of spliced cubes (as seen in the "Before" visgroup) - you can either copypasta a couple of cubes spliced 45 degrees across, or simply splice up one large square box into several smaller ones and splice from corner to corner. After that, it's a simple matter of selecting the vertexes on the top and moving them up or down (or, on a vertical wall, left to right). You should only need to move the vertexes across a single plane on a single face. Ye might be tempted to move them across more than one plane when uniting floors with vertical walls, but it should be achievable just by eliminating cubes from one terrain deform group or another. (If you choose to do it anyways, be sure to move vertexes in the opposing plane, or you may get invalid structures.)
Terrain deformation is done quickest with the "Arrow Keys Nudge Vertex" option enabled (Tools->Options->[2D Options Panel]). You can then select the vertex to move in the 3D view, move the mouse to the proper plane in the 2D view (don't click, just hover), and hit an arrow key to nudge the vertex. With some practice you'll be able to do this without taking your eyes from the 3D view.
Scaling, rotating, or otherwise moving terrain deformations of this type can result in deformed brushes that Hammer will fail to detect, causing visual artifacts, or mystery leaks. So once you've decided where your wall is going to be, stick with it. However, if your deformation is simple enough, and on a good grid, you can usually get away with copy-pasta'ing segments, flipping, and rotating them, to be tiled into new areas.
Real world examples of this method are included in this tutorial from Sfor, Wicard Oven, The_Wall, and the WIP map, Sewer Ride.
In the Sewer Ride and Wicard Oven examples, the terrain has been spliced across, post-deformation, to create red-crystal grooves for additional lighting. This works, but is dangerous - you might need a few attempts before you make a splice through them in a way that won't mess with Hammer or the compiler. It should also likely never be done on a segment exposed to the outside of the hull. (Which shouldn't be an issue if you keep your box framework intact.) Once you've made such a splice, forget about moving the wall in anyway.
Generally, you want to keep main pathing of your caves (ie. the floor) as flat as possible. This helps with both monster and player navigation. The tunnel from The_Wall can't be entered (it's clip brushed so you cannot enter - being there just for show). The Sfor example involves some drastically rugged floor terrain, and you'll see there are clip brushes scattered throughout to prevent your getting stuck therein. (Also, all the monsters in there are projectile tossers, and thus do not need to navigate the nasty terrain.)
This method is fairly friendly wpoly wise, but murder on clip and leaf nodes. To help with the clip nodes, the entire ceiling in the sfor example should likely be inside a clip brush. (Though in this instance, it was not). The Wall's example is entirely inside a clip in the actual map.
If you want a manufactured dome look, create a quarter of the dome, copy pasta, and flip, as in the Dome example here (each quarter is grouped). You'll notice the convex group is also done with a similar method - although in two halves, in that case, so even when going for natural looking terrain, you can get away with some copy-pasta and mirroring. All of the walls in the Sfor example are slightly varied versions of the same terrain formation.
Segmented Caves

segments from Rickler's sorc_villa
If you have a nicely aligned, and fairly simple cave segment, you can usually get away with splicing and, to a degree, skewing it. Provided in the "rickler_segmented" vis group is an example used in Sorc_Villa. Simply copy pasta your cave segment, skewing it here and there to add some variety. Your base segment should be perfectly square. If it is, you can then copy it onto itself, rotate, and splice each resulting segment at 45 degrees to create a 90 degree turn. If the segment is designed simply enough, and all the vertexes meet, it won't even leak. Notice, in the example, how each segment is in its own group.
Block Caves

aleyesu - proving, once again, quick and dirty gets the job done more often than not
In the South West corner are extensive examples of some block caves from Aleyesu. These usually involve three simple blocks and a floor, placed at various angles to create variety. Note that the blocks involved are not twisted to join up, but only meet at their corners, this helps keep VIS from becoming a real issue. The more often you can make your caves meet at 90 degree angles, and the more often you can create cube-like areas that VIS can isolate, the less likely you are to run into issues.
Key thing to avoid here is the "Chinese Fingertrap" effect. Don't use multiple wedges all joined at every angle stretching into unpredictable curvatures, or HLVIS's little mind will explode when you attempt to compile. The compiler thinks in box-like areas, try to work with it, rather than against it.
Simple Geometry

simple geometry from ww_shrinkspell
The example from Shrinkspell in the upper North East corner demonstrates various simple geometry turned into caves. This can be the most optimal method, and doesn't look too blocky when combined with some nice textures. There's no real advice here except the usual: Keep it Simple. There's no need to make crazy shapes that the compiler will have trouble digesting.
General Advice
• Keep your floors flat
- Remember monsters cannot navigate ramps in multiplayer, and rugged terrain, in addition to raising your leaf and clip limits, is rough both on players and the compiler.
- If you *must* have a large steep ramp, add a func_monsterclip staircase of 16 unit boxes. You don't have to worry about the monsterclip brushes intersecting with solid map brushes too much.
• Think inside the box
- You should be able to break down the basic structure of your map into boxes, which helps the "golden rectangle" method VIS uses to build nodes. Build from the outside in, with your brushes meeting at 90 degree angles as often as possible. Your rooms should always look simple and logical on at least one of the three planes.
• Keep it Simple Stupid
- The sacred rule of KISS. If you take a month off from mapping, you should have no issues figuring what you did when you come back to it. Group your terrain deforms. Keep a room-by-room style build (don't have brushes stretching across multiple VIS areas - it's hard on the eyes and the compiler).
• Lighting
- Don't attempt to imbed crystal structures into your walls unless both the walls and crystals are extremely simple (and even then, use func_illusionary crystals). The splice method works, but once you've done it, you're going to have to rebuild that wall from scratch if you want to move it. Another, safer method, not demonstrated here, is to use some glowing moss or slime. Take one of your existing textures, photoshop some pale moss or slime onto it, and put it back into your map. You can then stick a point-entity light next to the texture and it should look fairly natural. Don't scale the texture up to allow higher-detailed moss or slime, however, or you'll get that incorrect texture lighting effect when a glowing player runs across it, ala some of the glowing slime textures in Calruin2.

crystal splice

slime lighting - okay, those are trees, so sue me

glowing eyes from ancient artifacts and glowing lava textures work too
• Embed Ruins
- An endless twisting set of caves not only looks bad, but is hard on the compiler. Toss in some walls and a room of stone bricks once in awhile. You can take these opportunities to get your walls to line up, save you some vis nodes, and break up the monotony of your map.
Caves Tutorial said:Key thing to avoid here is the "Chinese Fingertrap" effect. Don't use multiple wedges all joined at every angle stretching into unpredictable curvatures, or HLVIS's little mind will explode when you attempt to compile. The compiler thinks in box-like areas, try to work with it, rather than against it.
There's an exception to this, and that is if you can keep all the joints lined up in at least one plane (preferably two), and break them up into segments, then HLVIS's little mind will remain intact.
Which brings us to...
The Chinese Fingertrap Method

The Chinese Fingertrap method involves this beast:

Basically, a cave segment, made up of nothing but 4 face alternating wedges, with all the vertexes lined up on a 16 unit grid on either end.
The advantage to a 4 face wedge, is that you can twist it any which way, and it won't cause a malform brush.
You can scale, skew, and vertex manip the segments all you want, and it wont cause errors, nor leak, so long as all the vertexes line up at the mouth to each cave segment.
Thus you can do really nutty things, like this:

Yes, those are all that same cave segment, including the bulbous room at the bottom, and no, it doesn't leak.
Advantages:
• Extremely flexible, very natural looking caves.
Disadvantages:
• Non-90 degree junctions are kind of a pain.
• Looks like ass in Hammer.
Plus, as with most of these caves, tunnel textures are hard to align.
Surprisingly it isn't too nasty on the clip node count, but if you are saving clip nodes by using a kinder -cliptype during compile, be careful that the caves don't become so narrow or so steep as to stop the player.
Mobs that don't jump will also have a rough time with these caves in laggy situations, so you'll need the usual 16-unit func_mosnterclip staircases used to deal with ramps.
The easiest way to vertex manip these batards, is to select two segments, hit Shift+V then drag out a box to select the joined vertexes away from the center:

(Mind you I've the "Arrow Keys Nudge" option active.)
But if you don't have to make a hard turn, or make a room from them, skew works just as well without vertex manipulation, so long as it's on a 16 unit grid.
This particular segment won't work well for artificial tunnels, but those generally end at 90 degree angles, making this unnecessary anyways. You can, of course, make smoother, rounder, and more complex tunnels, the same way, but this is about as many vertexes as my eyes can handle. (Plus, you need to keep your floors flat, so as not to mess with your mobs).
Mind the four seemingly superfluous brushes on the outside of the cave segment in this particular example. Leave them - they are guides to make it possible to scale/skew the segment on a 16 unit grid. The compiler will discard them.
This method really requires it's own RMF and BSP, so:
http://www.thothie.com/msc_dev4/chinese_fingertrap.rar
There's a lone example segment, sitting just NE of center.

todo's:
• Add slice&dice method
• Add model method

